Need a quick gift for that special person?
Want to make it yourself?
You can do this!
It's that easy.
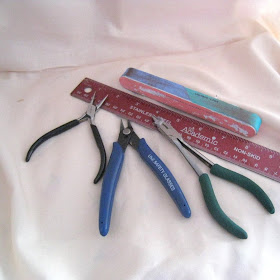
Here are the tools you will need.
 You will need round nose and chain nose pliers, wire cutters, a ruler, and a file of some sort.
You will also need: a hammer and a bench block.
You will also need copper wire, a copper jump ring, and 3 head pins.
If you don't have head pins, you can substitute small wire wrapped beads.
 Step #1
Cut about 6 inches of wire. (I used 14 gauge copper wire, but you could use 16 gauge.)
File the ends so that they are no longer sharp.
 Step #2
Make a loop at each end. Make sure that each loop is closed.
 Step #3
Using a hammer (I used a chasing hammer, but you can use another kind.) and a bench block,
(You don't want to ruin your table.), hammer the wire to create texture and work harden the wire.
Parents, if you are doing this with your children, be sure to supervise this step very closely.
Little fingers can really hurt if the hammer misses the mark.
With your file,
smooth the edges of the flattened wire.
 Step #4
Take two of the headpins and wire wrap them.
Add a jump ring to the top loop. Before closing the jump ring, add the two headpins that you just wire wrapped.
Close the headpin.
 Step #5
Loosely wire wrap the third headpin.
Open the bottom loop enough so that you can slip the third head pin through
the loop, then close the loop.
Your bookmark is finished!!
Remember, teachers love bookmarks!
I used to be a teacher, so I know.
You can find my head pins, here.
Have fun!
You can do this!
It's that easy.
Here are the tools you will need.
 You will need round nose and chain nose pliers, wire cutters, a ruler, and a file of some sort.
You will also need: a hammer and a bench block.
You will also need copper wire, a copper jump ring, and 3 head pins.
If you don't have head pins, you can substitute small wire wrapped beads.
 Step #1
Cut about 6 inches of wire. (I used 14 gauge copper wire, but you could use 16 gauge.)
File the ends so that they are no longer sharp.
 Step #2
Make a loop at each end. Make sure that each loop is closed.
 Step #3
Using a hammer (I used a chasing hammer, but you can use another kind.) and a bench block,
(You don't want to ruin your table.), hammer the wire to create texture and work harden the wire.
Parents, if you are doing this with your children, be sure to supervise this step very closely.
Little fingers can really hurt if the hammer misses the mark.
With your file,
smooth the edges of the flattened wire.
 Step #4
Take two of the headpins and wire wrap them.
Add a jump ring to the top loop. Before closing the jump ring, add the two headpins that you just wire wrapped.
Close the headpin.
 Step #5
Loosely wire wrap the third headpin.
Open the bottom loop enough so that you can slip the third head pin through
the loop, then close the loop.
Your bookmark is finished!!
Remember, teachers love bookmarks!
I used to be a teacher, so I know.
You can find my head pins, here.
Have fun!

What a beautiful and fun idea! Thank you for sharing!
ReplyDeleteBrilliant tutorial! Maybe my daughter and I can make these for Christmas presents. I know she has mad skillz with the beads, but she would love to be hammering away!
ReplyDeleteEnjoy the day!
Erin
nice! those would make great stocking stuffers!
ReplyDelete