Showing posts with label handmade. Show all posts

Monday, September 22, 2014

Ok, Now About Heather Power's Cane Boot Camp!!!!! It's AWESOME!!!!!!

I have to admit, I was stunned when I received the invitation to join Heather Power's online class, "Cane Design Boot Camp."

Heather had offered a scholarship for her class as a way of paying things forward.  I applied, but I decided that the odds were against me, but it would be nice if I won.

Guess what!!!!  Through the generosity of Heather who had decided to give 1 scholarship, I was awarded one of the 3 person's who were awarded a scholarship!  I am so grateful.  It's an amazing class so far. 

This is the first cane I made in Heather's class.  I am thrilled beyond words with it!!!

Now, let me show you the beads I made using this cane. 


This bead was made with the pile of scrap cane that I had made.  See the spiral?  That was an extra cane I made.  So far, I am thrilled with this class. 


I made these beads with the cane.
I love! Love! Love!  This cane boot camp.


Tuesday, November 19, 2013

Why I like Bead Artists Who Really Make Their Own Beads, in other words, BUY TRULY HANDMADE THIS SEASON!

More great work by artists who are truly handmade.
No factory made pieces allowed here!


Who's hiding in those leaves, Annette?

Here's a link to the puppies hiding in the leaves.

CLICK HERE

For a link Annette's etsy store, Dreams in the sand,

CLICK HERE.


Isn't this bead beautiful?
Debbie Altman of All My Beads made it!

Here's the link for the bead.

CLICK HERE

To find Debbie's shop

CLICK HERE

To read Debbie's blog

CLICK HERE


This pendant is from
Glass Dreams Hawaii.

To this beautiful pendant

CLICK HERE.

To visit Diane's store

CLICK HERE.


Check back on Thursday to see more artists who really do make their own beads.

Also, I have page here on my blog that will give you links to artists whose work is truly handmade!


Thursday, November 14, 2013

Why I like Bead Artists Who Really Make Their Own Beads, in other words, BUY TRULY HANDMADE THIS SEASON! Part 2!

Let me give you some examples of handcrafted art!

Candice makes some amazing dread beads.  She also works in polymer clay.  Take a look at her polymer clay cuff bracelets!  Wow!  I wish I could make them like she does!


Here's the link to this bead.

Here's the link to Candice's Etsy Store.


Laurie Ament makes great beads, too!  Look at this fish.

Here's the link to her fish.

Take a look at her Etsy Store.
Here's the link.

You can also find her on Facebook.

As if Laurie weren't busy enough, she's the advertising sales person for the Glass Bead Evolution Magazine for the ISGB.  If you would like to advertise, and it's a great magazine, here's her email address: sales@isgb.org
 
 
This bead was made by Gay Massender.  I love it!  She used a reverse painting method on the bead!
 
Here's a link to the bead.

Here's a link to her Etsy store!


I guarantee that these artist are truly handmade artists!  Have no fear Christmas shopping in their Etsy stores!

Wednesday, April 24, 2013

How to Make a Scarf in under twenty Minutes - Easy Peasy

I love wearing scarves.
Since I fell and conked my head on the ice,
I have developed areas on my neck that show the blood draining.
I decided to cover those areas up with a scarf.
Here's a quick and easy way to make one in under twenty minutes.

Here's what you need.
You need 1/4 yard of fabric.  I like to use knits that don't ravel.
You need thread, needle, and a pair of scissors.

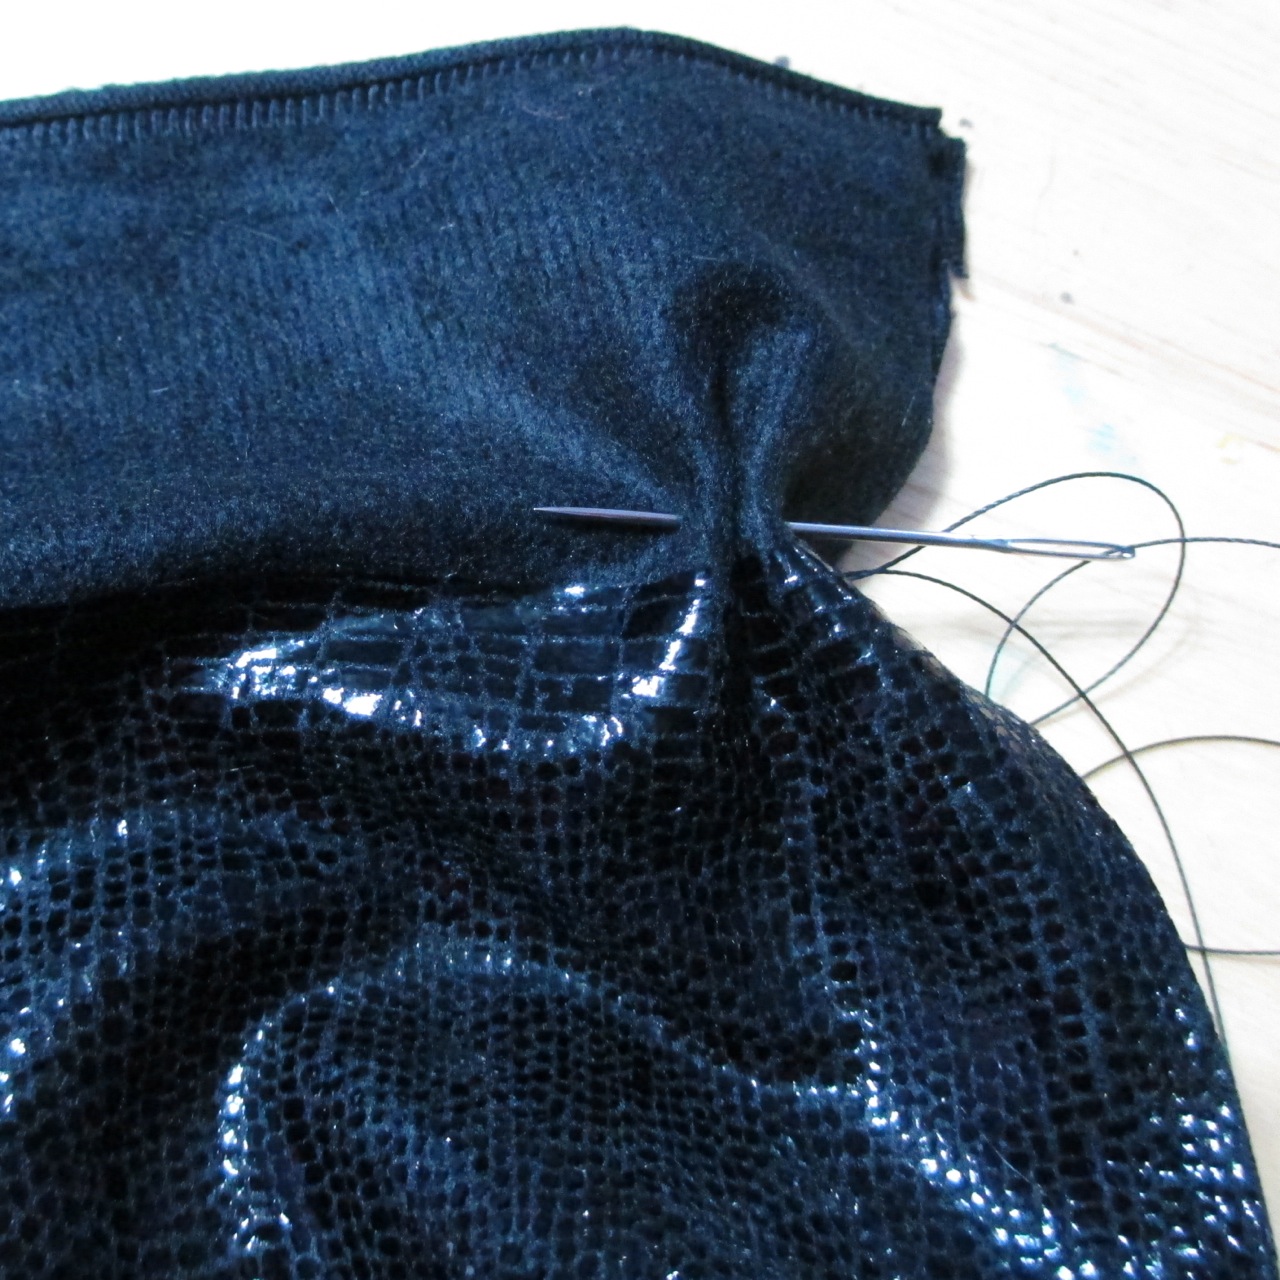
Knot your thread and stitch the edge of the fabric across to the end.

Pull the thread to gather the fabric into a rosette.
Knot the thread.
Wrap the thread around the rosette and make two knots to hold the fabric.

Woo Hooo!!! 
You're done.
You have a new scarf in less than 20 minutes!

Tuesday, October 5, 2010

Cheat Sheets


This is my homemade cheat sheet.
------------------------------>


One of the biggest challenges I face when I make beads is the challenge of combining colors. It's really a challenge at times, for me, to put together colors that blend and please the eye. I have been working on ways to do this. Yes, I do have a color wheel, and I use that a lot!!!!!

This cheat sheet came about one day as I was looking at earthen, organic colors in my glass. As it often happens, I opened a magazine advertising clothing in beautiful earth tones. Immediately I tore out the two pages and began to cut the sheets up. The colors blend well together. Graphic artists are much more experienced than I am in the area of combining colors. It was a no brainer. I made my first cheat sheet, and it has helped. Now, I do a little bit of planning, and soon, I am making beads with colors that coordinate and contrast as they should.


These beads were inspired by the the second tab on the left hand side of my cheat sheet. I think it's beginning to work. You can find Pathways here. They remind me of trails and paths in the sands of life.

Now, my goal is to develop a cheat sheet for the brighter colors that I love! I'll show that later!

Let me know if you use this idea! I'd be interested in the results. Until tomorrow, then....

Wednesday, May 26, 2010

I'm Making Vessels Again


It's been awhile since I made vessels, but I wanted a fire vessel to wear around here. Here's a photo of it! What do you think?

If the truth be told, I wanted a vessel to wear at the Bead and Button Show which is coming up very soon. Then I realized, as I shaped and blew this vessel into form I had forgotten how much I enjoyed making vessels. So, I dipped my mandrels so that they would be ready for tomorrow's torch session.
I'm making vessels again!


Here's a vessel I have listed in my Etsy store right now. This organic style vessel is so very pretty!


I call this vessel Broken Shell Vessel. It's a vessel that does not hold anything. The front of the vessel is open so that it looks like a shell.


I'll be showing more vessels as I make them. I'm also looking for a bag of vessels that I had, but now, I've lost! I probably put them away. I'll probably find them in a year of so. I guess that I had better get to work and make more vessels to replace them. Photos to follow later.

Tuesday, May 4, 2010

What's Going On With All These Beads


Here's a picture of some lampwork beads I made. Now, I'll show you what I'm going to do with them.

Wait! I haven't done anything with them. I'll be sure to show you later.

Clue: The Bead and Button Show is coming up. Hmmmmm! What do you think?

Tuesday, March 9, 2010

If I could Love you More


It's not always easy to love
or to find love,
It's not always easy to give love
or to take love,
It's not always easy to see love
or to let someone see you love,
but
If you could love more,
You would find love,
You would give love,
You would see love
In all that you do
In all that touches your life,
Love,
Pure Love,
Only Love,
Peace, Love and Joy!

Friday, December 4, 2009

Rice Bags


I use them all of the time! They are great for sore, aching, tense muscles. They are great for the sinuses. They keep us warm at night. Rice Bags! I love mine. The best part is that they are easy to make with or without sewing. Rice bags also make wonderful gifts! Think of that special person in the nursing home. They might appreciate your handcrafted rice bag.


When making a rice bag, I like to use pretty fabric. I cut the fabric across the width and make a long tube. I stitch across leaving one of the short sides unstitched. Before sewing up the unstitched end, I add my rice. I fill the tube 3/4 of the way full of UNCOOKED, DRY RICE. Please remember UNCOOKED! Do not use MINUTE RICE! Only use rice that requires cooking time and is not ready in one minute. I cannot emphasize that enough!!!!!!

When the rice bag is filled 3/4 of the way full, stitch up the unsewn end. You now have a rice bag.

You can make rice bags big or small. They can be made the size of your forehead. You can make them big enough to cover your feet, and, in a pinch, you can use a sock!


Long white tube socks work the best. This sock is just here to give you a visual. Open the tube sock and fill 3/4 of the way with UNCOOKED RICE. That rule won't change. Tie a secure knot at the top of the sock. You have a quick and easy rice bag.

Rice bags can be frozen, but I like to use them warm. I toss my rice bag or bags in the microwave. Since microwaves vary, I won't recommend a time. Just play around with the time. l wouldn't heat it for more than 2 minutes. Two minutes in the microwave, make my rice bags very warm. Start out with 1 minute and work your way up to the temperature you like. When I'm tense, I put my rice bags on my shoulders. When I'm cold in bed, I really warm those rice bags up and put them under the covers. When I wake up in the morning, they still have a little heat, and I have been toasty warm all night. I have found that rice bags work well for my headaches, too. If you like, add a drop or two of your favorite essential oil to the bag. The fragrances are wonderful! I use my rice bags all year long. Since it's that time of the year, I need to replace the ones that have fallen apart from vigorous use. What do you think? Have you ever used a rice bag? Would you, if you could?

Friday, February 13, 2009

Featured Etsy Store: May Beads Handmade Lampwork Beads


Need a smile? Want to smile? You need to visit May Beads on Etsy. Lauren Mazursky is the proprietor and chief bead maker for this shop. (I honestly think she's the ONLY bead maker for this shop!) Look at Blueberry! Blueberry is one of Lauren's newest items. Isn't she the most adorable cow you've ever seen? Look at those eyes! Now how cute is that?

What did I say about a smile? How could anyone resist Archie? He's an alien and isn't he cute? Lauren, I love your work!


Like jewelry? How about these little turtles on your ears? Aren't they sweet?


Last, but not least, meet Skillet the Pig. Who could think of him on a skillet? Look at those sweet eyes. He's adorable!

I was trying to think of what I liked best about Lauren's work. I honestly think I love the personalities she gives to her little critters. Their eyes are wonderful!

Remember to stop and say hi when you visit Lauren's store. You will enjoy your visit.

Sunday, July 27, 2008

Frit - Ground Glass- My Shorts


This is handmade frit. You can tell it's handmade because of the many different sizes of frit in the container. I made this frit using the nubs that result when I get to the end of a glass rod or rods.
Making frit is very easy. It takes some simple tools. Most of the tools can be found around the house or purchased at a hardware store. Yes, I said a hardware store. Take a look and see what I have experimented with as I practiced making home


This is a very simple way to make frit. You simply heat the rod and then plunge it into some water. The glass cracks. I didn't like it because it took forever to get a decent amount of frit to use.


The next method Involves a tool that most of us have in our homes, the simple hammer. I tried this but I found it difficult to use because glass flew everywhere. It goes without saying that safety glasses are needed when you use this method.


Next I tried a more modern and innovative method for making frit. I used an old coffee grinder. The problem with that method is that the coffee grinder being as powerful as it is, ground the frit to a find powder and it was easy to breathe in ground glass. You need a mask for that this method, too. The other problem I found with using a coffee grinder was that plastic from the lid got into the frit causing small fires to break out when using the frit on the molten glass. Beside, who wants to breathe plastic that's burning?


I finally made a trip to Mutch's Hardware, a small family owned business. The owners, Sandy and Dave Mutch are good friends, and help me often when I come in looking for the ingredients for making handmade tools for glass work. When I described to Dave what I wanted, he provided me with the items I needed, and look, my favorite frit makers, all made with parts that can be found at a hardware store, any hardware store!
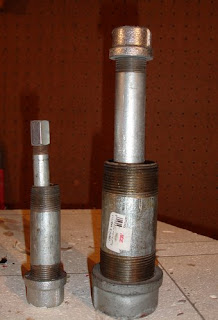
In my opinion, these tools make the best frit. I use the small one when I need emergency frit. I use the larger one when I actually plan out my frit. I love them. They give you exercise as you pound, and they help to get rid of that pent up frustration that happens in our everyday lives.


Then there is a way I use very frequently. I simply buy my frit. The suppliers are numerous. The frit is sized appropriately, and there is no glass dust to deal with. Most of the time, I like that method the best. The only downside is that you can't use your nubs of glass, and that it takes a few days after you order to receive your frit. Oh well, life is like that. I love using frit in glass! I also truly believe that when there's a will there's a way. There always is.