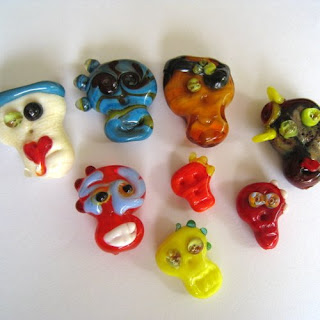
As I write this quick little tutorial on how to make a lampwork bead skull, it's pretty warm outside, and it's summer. I can't help but think of fall, pumpkins, and Halloween.
Skulls are fun beads to make, and they can be very easy.
Materials:
1 rod of dark ivory (You can actually use any color you like, but I chose this color because it looks more like a skull to me.)
a brass marver
tungsten pick or uncoated mandrel
some type of masher
mandrel coated with bead release

1) I begin by making a tube bead the length I want my skull to be.

2) I continue to add glass to the bead so that one end has more glass than the other end of the mandrel. Notice, too, that there is a bit less glass in the middle of the bead.

3) Using my brass marver, I make indents about 1/3 of the way to the top. I also flatten the bead at this point. You can see, now, that the shape of the skull is beginning to form.

4) Remembering to keep my bead warm by flashing it in the flame, I take the bead out of the flame quickly, and using my tungsten pick or my uncoated mandrel, I make indentations in the bead for the eyes and nose. After doing that, I warm the bead up again in the flame. I don't want the bead to go back to the molten state, so I flash the bead in the flame.

5) Again, using my tungsten pick or uncoated mandrel, I make a mouth on my skull. Again, I flash the bead in the flame before I put this easy peasy skull in the kiln to cool down properly.
See what I mean? Easy Peasy!
Variations using the same tools. You might need to use your tweezers, though with these variations.

1) change the color of your skull
2) Add shards
3) Add a stringer or twistie
4) I like to use murinni for the eyes
5) Add a cap
6) Add a tongue sticking out
7) Change the size
8) Make an eye patch
9) Make a mask
10) Add teeth
11) Encase
Feel free to use this tutorial to make your own skulls and sell them. Pass it on to your friends. My only request is to have fun making them! We all need a little fun now and again!

7 comments:
Thanks for visiting my blog! Love what you do! I've always thought of trying bead making, but haven't got around to it yet....you do great work!!! Have a great day!
Nice tutorial Mallory. I still have to send some "interesting" interview questions your way. If it weren't for slow I don't think I'd have a speed. Hugs....
Thank you so much for this tutorial! I'm starting in on my halloween stuff, and getting quite tired of making little spiders lol :).
These skulls look like so much fun I can't wait to head out to the torch to go try it.
Hi! I think this is such a cool project for Halloween? Would you mind if I linked to your tutorial from my site, www.AllFreeHolidayCrafts.com?
Let me know...
Thanks!
Rachel
Hi,
I just wanted to let you know that I featured your tutorial on my site, www.AllFreeBeadedJewelry.com. I linked to this project:
http://www.allfreebeadedjewelry.com/Glass-Beads/Adorable-Glass-Skull-Beads
I would like to know if I can link like this to you, including a photo, in the future. Or if you would be willing to allow me to post projects in full on the site - full credit will always be given to you, of course. Your projects have the opportunity to be featured in our newsletter as well. It would be yet another source of traffic to your blog.
Once I have two projects on the site I can start a designer profile for you with links back to your blog, store, facebook, etc. Here is an example of one: http://www.allfreebeadedjewelry.com/Jewelry-Designers/Pearl-Blay-Jewelry-Designer
Please let me know, I would love to work with you further.
Thanks!
Maggie Kmiecik
Maggie, I tried to send you an email, but I wasn't able to contact you. Could you please send me an email so that I can respond to you? Thanks.
Appreciate your tutorial! Many thanks for sharing. I'm a novice at lampwork & appreciate your sharing your knowledge! Hazel
Post a Comment